Thinking about building a patio, walkways, retaining walls, or an outdoor living area? A backyard hardscape project guide helps you move from ideas to reality with fewer problems. Whether DIY (Do-It-Yourself) or hiring professionals, good planning prevents cost overruns, drainage issues, and regrets.
In this article, we’ll walk you through everything from early planning to final installation. You’ll learn what to consider before building, how to work through materials and design choices, how to break down the construction process step-by-step, and how to maintain your finished hardscape for years to come. To help you stay on track, we’ve included a hardscaping checklist table at the end that you can print and use during your project.
Step‑by‑Step: From Vision to Finished Hardscape
Below is a detailed backyard hardscape plan and execute your backyard hardscape project.
1. Define Goals & Vision (Use & Function)
You must begin by defining why and how you’ll use the space. Is the goal:
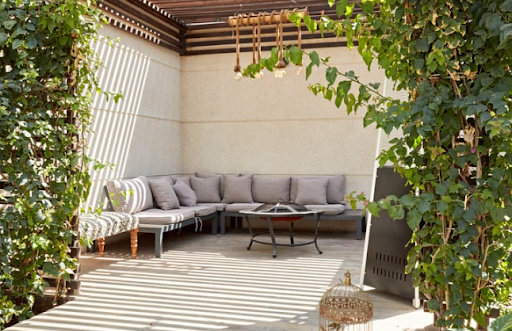
- A relaxing patio for furniture and grilling?
- Walkways to connect yard zones?
- A fire pit/entertaining feature or built-in seating?
- A retaining wall or terrace to solve slope issues?
- An outdoor kitchen or bar area?
Sketch a rough bubble diagram, write down your priorities, and explain how people will move through it. Use tools or apps (e.g., landscape design apps) to mock it out.
2. Assess the Site & Conditions
This is critical. A good plan is ineffective if your backyard has issues you miss.
- Measure and map the area, including vegetation, trees, slopes, walls, structures, utilities, and drainage paths.
- Check elevation changes. You may need cuts, fills, or retaining walls
- Observe sun, shade, wind patterns, and consider how features will look throughout the day.
- Check soil and subgrade for compaction, organic content, and clay content.
- Mark underground utilities(e.g, underground pipes) before digging.
- Note drainage and water flow because you don’t want water pooling in your new hardscape.
3. Establish Budget & Phases
Decide how much you’re willing to spend overall and allocate budgets to different zones such as the patio, walkways, and other features. Always leave 10–15% contingency for unplanned events.
If your budget is limited, you can phase the project. Do core parts first and later add features like lighting or water features.
4. Choose Materials & Style
Your choices here affect cost, maintenance, and durability. Some common materials:
- Natural stone: Flagstone, bluestone, and slate are elegant but often expensive
- Concrete pavers or slabs: Flexible design and easier repairs
- Bricks: Classic look and moderate maintenance
- Gravel or decomposed granite: Low cost and good in transitional zones
- Permeable pavers: Help with drainage, and can qualify for an eco-friendly design
Consider color, edge style, texture, pattern, and how it complements your home exterior and surrounding landscape.
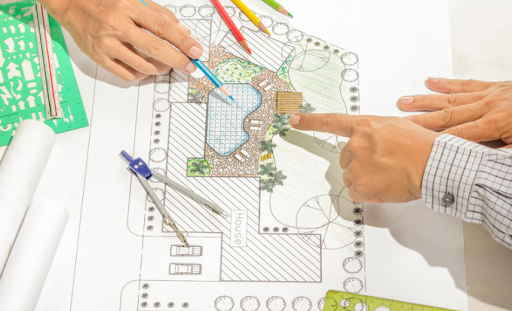
5. Produce a Design Plan & Layout
Create scaled drawings or have a professional do them. Include:
- Outline of hardscape features such as patios and retaining walls
- Grading lines or contour lines
- Drainage arrows
- Softscape integration (where plants will go)
- Materials legend
- Lighting, seating, and fire feature locations
- The width of walkways
6. Permit Checks & Local Codes
Check with your city or HOA (Homeowners Association) if you need permits or inspections, especially for retaining walls, fire pits, or structures. Ensure you follow setback, height, and drainage rules.
7. Site Preparation & Excavation
Before building anything, you need a clean and properly shaped space to work with. This step involves clearing the area, setting the right slope and depth for your project.
- Clear vegetation, debris, and topsoil.
- Grade the site to a proper slope, typically 1%–2% slope away from structures
- Cut to depth in the designated site to accommodate the base, bedding layer, and pavers
- Add geotextile fabric if needed for weed suppression and preventing soil mixing
- Firm up the natural soil underneath your project to prevent future sinking or shifting before adding gravel or stone layers.
8. Base & Sub-base Installation
A good base is fundamental because this is where most hardscaping projects fail. This is where you lay down layers of material that support the structure and help with drainage.
- Place a layer of crushed stone or aggregate for the base.
- Add and compact your base material in thin layers to build a solid foundation that won’t shift or sink later.
- Ensure the base is level or has a proper slope.
- Check depth to match your paver thickness and bedding material.
9. Bedding & Laying Materials
Once the base is ready, you move on to laying the surface materials like pavers or stone. This part is where your design starts to take shape.
- Spread and level out the bedding sand for pavers.
- Lay pavers, stones, or slabs in chosen patterns.
- Use small spacers between each paver to keep the gaps even and straight as you build.
- Cut pieces carefully with a saw or grinder.
- Use edge restraints along all perimeters to keep pavers locked in place and prevent them from spreading or shifting over time.
10. Jointing, Compaction & Finishing Touches
With your layout in place, it’s time to put it all together and add the final touches.
- Sweep joint sand or polymeric sand into paver gaps.
- Compact the surface gently so pavers lock in for stability.
- Add edging where needed to define borders, keep materials like mulch or gravel in place, and give your hardscape a clean and finished look.
- Add sealant if chosen to protect pavers from stains, water damage, and fading, while also enhancing their color and extending the life of your hardscape.
- Install lighting, seating walls, planters, or fire features.
11. Final Clean Up & Irrigation Check
Once everything is installed, the job’s not done. A thorough clean-up and system check helps wrap up your project correctly.
- Rinse and clean all surfaces.
- Check drainage flows for any water leaks.
- Check that plant bed transitions are smooth and tidy, with clean lines between mulch, lawn, and hardscape to give the yard a finished look and help guide water flow.
- Make sure all seating, lighting, and fixtures are secure, level, and functioning properly to ensure safety and a finished appearance.
12. Maintenance & Durability Plan
To ensure longevity:
- Reapply sand and sealant to protect pavers and keep joints tight every 2 to 5 years.
- Regularly check for uneven or damaged areas and fix them early.
- Clear leaves and dirt, and prep your space for cold weather.
- Address stains, moss, or weed intrusion to keep surfaces clean and safe
Checklist Table
Here is a backyard hardscape checklist you can print or use digitally when planning or executing your project:
| Step | Task | Notes | Checkbox |
| 1 | Define goals & usage zones | Sketch ideas, list priorities | |
| 2 | Site assessment & survey | Map existing features, slopes, and utilities | |
| 3 | Budget & phasing plan | Overall and zone budgets | |
| 4 | Material and style selection | Colors, textures, permeability | |
| 5 | Detailed design & layout | Scaled plans, drainage arrows | |
| 6 | Permits & code check | Local rules, HOA guidelines | |
| 7 | Clearing & grading | Establish slope, clear debris | |
| 8 | Base & sub-base construction | Compacted, stable base | |
| 9 | Bedding layer & paver placement | Level bedding, precise laying | |
| 10 | Jointing, compaction, finishing | Lock in pavers, edge restraints | |
| 11 | Clean up & initial checks | Flush surface, test drainage | |
| 12 | Maintenance schedule | Sealing, repairs, and cleaning over time |
Why Planning First Saves You Time & Money
Many hardscaping failures come from skipping the planning stage or underestimating site issues, especially drainage, soil, or weight load problems. Experts say base and drainage preparations are where projects often fail.
A solid plan helps you:
- Visualize the use and flow of space
- Budget realistically (materials, labor, hidden costs)
- Avoid mistakes with drainage or base preparation. Poor support can cause cracking, shifting, or sinking over time.
- Choose materials that suit your climate
- Communicate clearly with contractors
Key Concepts & Terms to Know
Before diving into steps, get familiar with some concepts and terms often used in hardscape design and planning:
- Hardscape vs Softscape: Hardscape refers to non-living structural elements like patios, walkways, walls, fire features, etc. Softscape is the living (plants, soil, grass) side that complements hardscape.
- Permeable vs Impermeable Surfaces: Permeable pavers or gravel allow water infiltration; impermeable surfaces (solid concrete, dense pavers) don’t.
- Base & Sub-base Preparation: Layers of compacted crushed stone under your pavers or slabs to provide stability and drainage.
- Edge Restraints: Borders or metal edging that prevent lateral shifting of pavers.
- Slope & Drainage Grade: Ensuring your hardscape flows water away from structures and not toward them.
- Jointing Sand or Sealant: Sand or polymeric materials are used between pavers to lock them in place and reduce weed growth.
Tips & Best Practices for Smart Hardscape Planning
- Always consider drainage: You’ll want water to move away from your home and hardscape.
- Start small if unsure: You can expand later. A modest patio, walkway, or fire pit can evolve into a full system.
- Plan for utilities & lighting early: Avoid cutting features or wires after installation.
- Match scale: Don’t overwhelm a small yard with giant pavers or walls; keep elements proportional.
- Mix hardscape and softscape: Integrate planting pockets to soften edges and add a more natural feel.
- Test your layout: Before digging, run hoses or stake outlines to see flow and visual feel.
- Buy 5–10% extra materials: Mistakes, cuts, and breakage happen.
- Find the right contractor or team: Experienced hardscaping pros understand drainage, compaction, and structural integrity.
- Plan for seasons: In Northeast Ohio, expect freeze-thaw cycles. Use frost-resistant materials and proper winter maintenance.
Choosing Unique Landscaping for Hardscape Design
Planning and building a hardscape project on your own can be overwhelming. That’s where Unique Landscaping comes in. With decades of experience working in Northeast Ohio, we know how to design hardscapes that last through all seasons while still looking great.
Here’s what makes Unique Landscaping a trusted hardscaping company for homeowners:
- Expert Guidance: We help you make smart decisions about layout, drainage, and material choices. Our team knows how to design around Ohio’s weather and soil conditions.
- Custom Design Plans: Every yard is different. That’s why we take time to understand how you’ll use the space. Then create a plan tailored to your needs, from patios and retaining walls to fire pits and walkways.
- Reliable Installation: Our skilled crews focus on craftsmanship. We prep the base properly, install edge restraints, compact everything thoroughly, and leave you with a hardscape that holds up for years.
- Project Management: We keep things simple and clear, so you’re never left wondering what’s next. From first consultation to final cleanup, we’re with you every step.
- Long-Term Value: A good hardscape improves curb appeal, adds property value, and makes outdoor living more enjoyable.
If you’re ready to start planning your project or just want help figuring out what’s possible, reach out to Unique Landscaping. We offer free consultations and are happy to walk you through the process.
Moving Forward With Your Hardscape Plan
Planning a backyard hardscape project is more than building stone slabs. It’s designing functional, beautiful outdoor environments that last. When you follow a methodical approach, from goals, site work, materials, to maintenance, you greatly reduce risks and problems.
If you’d like help bringing your vision to life, Unique Landscaping can walk you through this process, help with design, sourcing materials, and expert installation tailored to your site and climate. Contact us today for a free consultation and let our team help you plan and build the perfect hardscape.